My bicycle not only helps me circumvent traffic, but it also takes me on an adventure. But let’s face it, pedaling for a long time can make us worn out.
It’s even more tiring when going through tough hills and riding up mountain slopes. So, what can you do? Simple! You can make your own homemade motorized bicycle. Doing so can also satisfy your DIY mania!
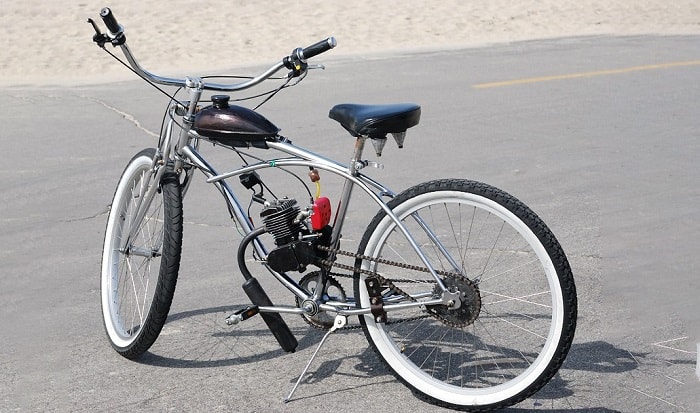
Knowing how to build a motorized bicycle from scratch is no problem if you have a motor kit and follow the right process by installing the engine fitting first.
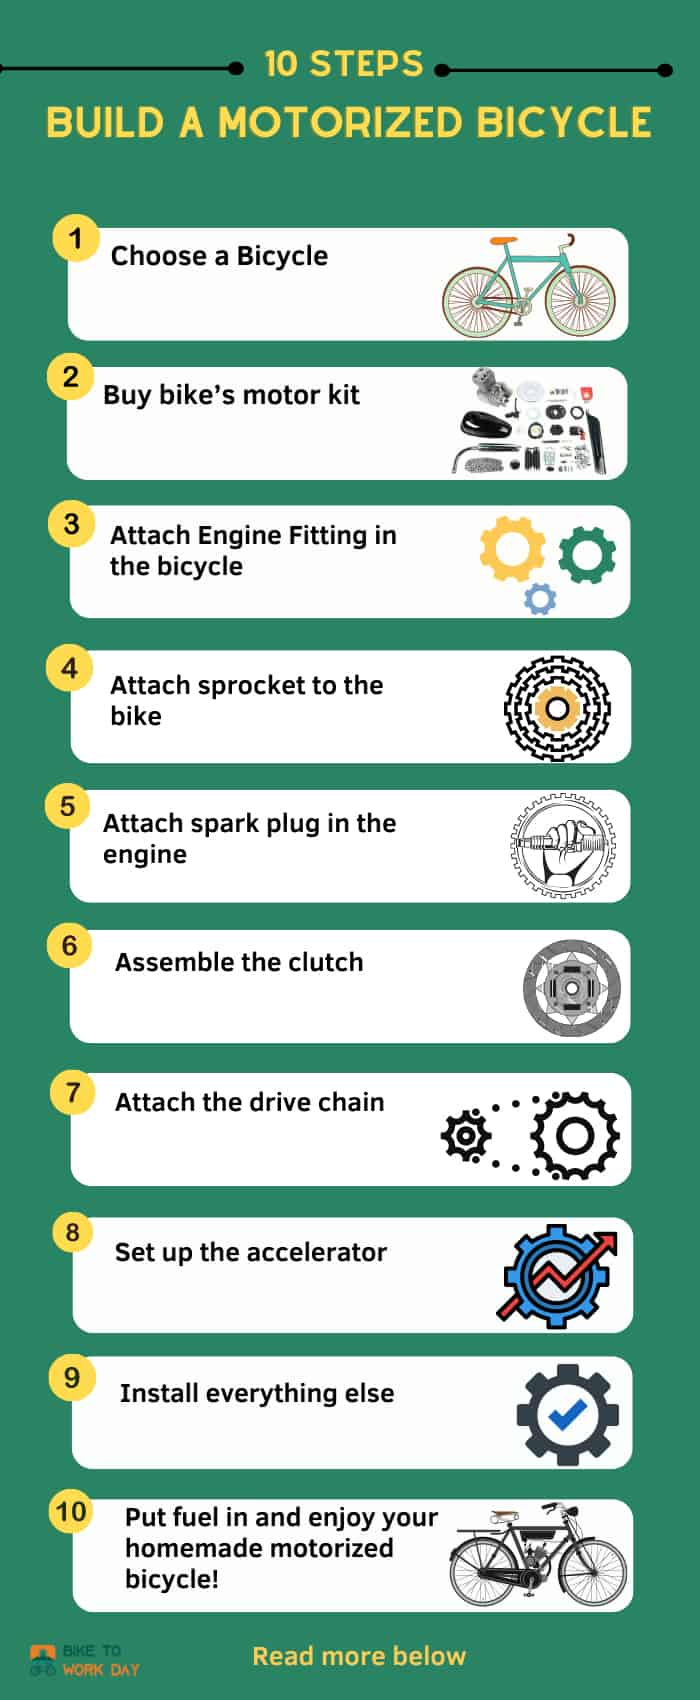
Table of Contents
- Tools You Need to Build Your Motorized Bicycle
- Step by Step to Build a Motorized Bicycle
- Step 1: Choose a Bicycle
- Step 2: Buy bike’s motor kit
- Step 3: Attach Engine Fitting in the bicycle
- Step 4: Attach sprocket to the bike
- Step 5: Attach spark plug in the engine
- Step 6: Assemble the clutch
- Step 7: Attach the drive chain
- Step 8: Set up the accelerator
- Step 9: Install everything else
- Step 10: Put fuel in and enjoy your homemade motorized bicycle!
- Conclusion
Tools You Need to Build Your Motorized Bicycle
These are some of the essential tools you need when you build a motorized bike from scratch.
- Allen wrench
- Gasoline container
- Glass measuring cup
- Knife
- Marker
- Needle nose pliers
- Screwdriver set
- Spray lubrication
- Starter fluid
- Zip ties
- Ratchet
- Chain breaker
Aside from the essential tools, these supplementary materials are also needed. These are great to start your DIY journey with.
- A bicycle
- Bike Motor Kit
- Connectors
- Gas tank
Step by Step to Build a Motorized Bicycle
Step 1: Choose a Bicycle
Choosing the right bike is important! Do not purchase a low-cost bicycle from WalMart or Target!
The first step in building a motorized bicycle is buying a bike with a correct frame structure, one that’s sturdy enough to accommodate the tank and engine perfectly. The bicycle frame must have a triangle space.
Step 2: Buy bike’s motor kit
After buying a bicycle, it is time for you to purchase a bicycle engine kit. There are many kinds of engine and motorized bike kit that can be found on various websites. Choose any engine bike kit of your choosing.
When I was building my own homemade motorized bicycle, I chose a kick start engine. This type of engine is recommended because the engine does not require a battery for it to start. But you can choose any engine bike kit you want.
Step 3: Attach Engine Fitting in the bicycle
Install the engine from the bike motor kit between the bike’s frames. It should be a tight fit on the required frame. If the engine doesn’t get installed securely at first try, you’ll have to make whatever adjustments necessary to get it to fit snugly.
Use the mounting bracket of the engine and bolts to fit it on the bike’s frame correctly. You must secure the engine perfectly, or it can fall off when you are riding and cause accidents.
Step 4: Attach sprocket to the bike
In attaching the sprocket to the bike, follow these steps consecutively. First, use a ring spanner to loosen the two rear wheel nuts. Then, remove the back wheel sprocket’s chain. Also, remove the back wheel.
Place a rubber bush on both sides of the tire’s shaft. Install the included sprocket in the bicycle motor kit in the rear wheel shaft. Then, the screws must be inserted inside the sprocket.
Insert a C-shaped steel washer behind the screw. Tighten all the screws with the nut. Then, reinstall the wheels on your bicycle.
Step 5: Attach spark plug in the engine
The spark plug is used to ignite the gasoline when starting the bike. Attach the spark plug to the top of an engine by turning it.
You must install the spark plug in the engine correctly because if a spark plug is not installed the right way, the motorized bike will not start.
Step 6: Assemble the clutch
With a driven shaft, a clutch is used to engage and disengage the engine. A clutch looks like a handbrake and must be installed on the left side of the bicycle. Follow the steps below to assemble the clutch to the bike correctly.
First, the break from the left side of the handlebar must be removed. The clutch must be inserted on the left side of the handlebar. Then, you insert the other side of the clutch wire into the hollow bar. Afterwards, this wire should go into a bar that’s straight.
Tighten the clutch wire. Then, apply the clutch; you should see the long bar move inside.
Step 7: Attach the drive chain
The drive chain carries the power from the engine to the rear wheel. So, you must attach the chain properly between the bicycle sprocket and the engine. In attaching the drive chain, follow these steps consecutively.
First, you must open the engine cover where the sprocket is located. Open the master link of the chain. Insert 1 end of the chain in the engine sprocket.
After inserting a few links of the chain, use a ratchet and turn the motor gear so that you can get the end of the chain on another side of the sprocket. Then, take another end of the chain and fit it on the rear sprocket.
Combine the two ends of the chain and make a tight fit. If the chain is longer than needed, use a chain breaker to remove a few links. Use the main link to join two ends of the chain.
It is important that you tighten the chain properly to avoid problems and accidents when using the bicycle. Tighten the bolt so that the chain is secured correctly.
Step 8: Set up the accelerator
Set up the accelerator for the bicycle on the right side of the handlebar.
First, attach one end of the carburetor to the accelerator. Then, remove the brake on the right side of the bike. Insert the accelerator into the handlebar on the right side. Then, tighten the screw to mount the accelerator.
Step 9: Install everything else
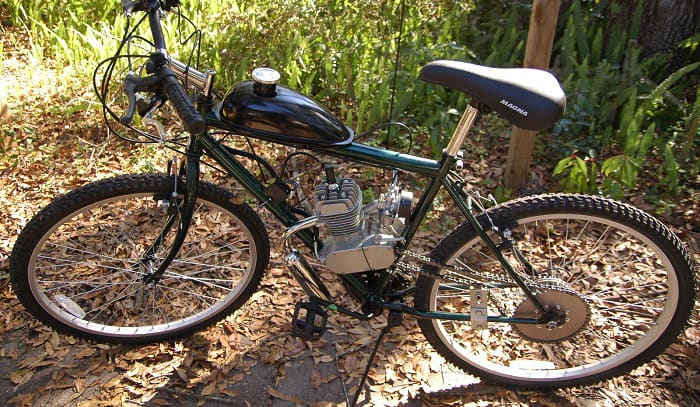
Attach a carburetor to your DIY motorized bike. A carburetor supplies the engine with the correct air-fuel mixture. Attach the carburetor to the engine manifold; the cable must be straight.
Install a gas tank for the fuel. Choose any petrol tank you like that will go well with your DIY bike. Place the tank on the top straight bar of the bicycle. Tighten the tank using a bracket. Now, connect the tank with the carburetor using a tube.
Install a muffler for the exhaust system of the homemade motorized bike. This muffler reduces the volume of the sound pressure generated in an engine. That is why a muffler is also called a silencer.
In installing the muffler to the DIY bike, you must use a bolt to attach the muffler to the engine exhaust. The muffler must have a gasket when it is attached to the engine.
Step 10: Put fuel in and enjoy your homemade motorized bicycle!
It is time now to put fuel in your gas tank to start up your motorized bicycle. When inserting fuel in your gas tank, also insert oil for lubrication of the piston and engine. Put in 1 liter of fuel and 40 ml of oil. Do not insert the oil in advance.
Since the bike does not need a battery startup, to ride it, just push the clutch inside. Ride the bicycle by paddling very quickly. Then, release the clutch after paddling 4 to 5 times.
I hope your engine works well. Enjoy your DIY motorized bicycle made from scratch. Be safe on your ride.
Conclusion
Now you know how to build a motorized bicycle from scratch! Just make sure to prepare the correct set of tools, especially the kit. Since all processes can be followed as long as you have focus, there should be no problems at all.
In my opinion, it is better to buy a complete set of bike kits than buying separate parts. Did you find the article helpful? Let us know!
Read more:

“I ride my bike to work for years, but is that enough? Our carelessness towards our surroundings has taken a toll on the environment. And now, everyone is responsible for changes; even the most minor contribution is counted. With this hope and spirit, I started with my partner to establish Biketoworkday to help more individuals commute to their work sites on their bikes.”