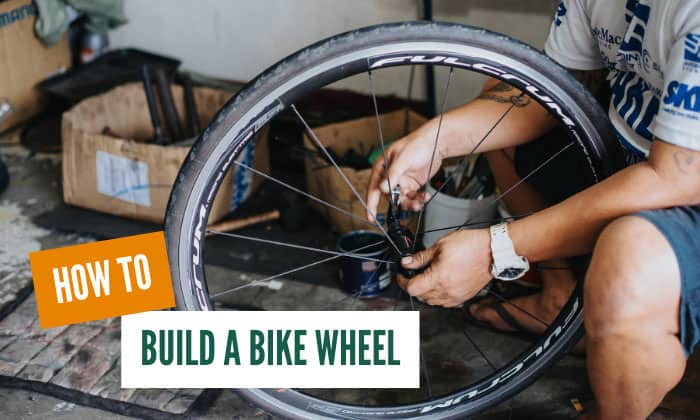
There are many DIY projects these days, and how to build a bike wheel is just one of them. But when you build your own bicycle wheels, it’s more than just about having something to show off to others. This can pave the way to making a custom wheel.
We’ll take a look at the process of assembling a bicycle wheel using commercially available parts. It’s not a project where you build everything from scratch, but it will still present a fair bit of a challenge to anyone doing it for the first time.
Keep reading to learn more.
Table of Contents
What You’ll Need
Bicycle wheel rim
- Spokes
- Nipples
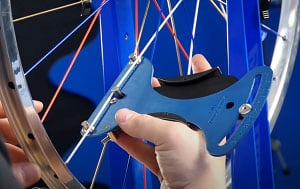
- Nipple driver
- Spoke wrench
- Lubricant for spokes
- Wheel building stand (optional)
- Tension meter (optional)
Step-by-Step Guide to Build Bicycle Wheels
Step 1: Prepare the materials
The first step is to prepare the materials or a bike wheel building kit. Choose your rim, hub, and the number of spokes you want to use. Those with more spokes, such as 36 spoke bicycle wheels, offer better durability while being slightly heavier.
It’s also important to determine the proper spoke length. You can use an online wheel building calculator where you can input details, such as hub and rim type, to get the measurement needed.
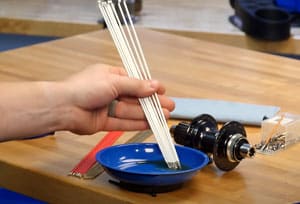
We’ll be building a 32-spoke wheel, so we’ll also need an equal number of components. Apply oil to each of the spokes, then divide them into four groups having eight for each set.
Step 2: Begin with the drive side
Let’s begin with lacing the wheel. There are different bike wheel lacing patterns. In this guide, we’ll use a semi-tangent cross 3 pattern, as it’s the most common one. Begin with lacing the drive side first.
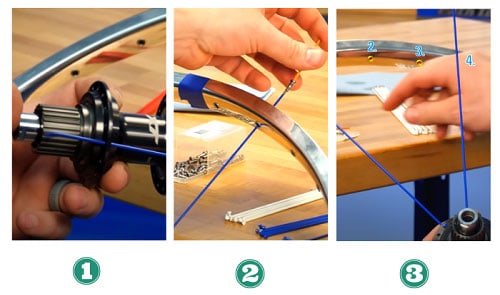
Find the valve hole on your rim; we’ll need to refer to this again, so take note of its location. Next, find the brand logo and identify the drive side of your hub. Take a look at the flange to the right of this brand, this will be the first flange that we will use.
- Insert a spoke from the outside into the first flange and secure it.
- Take the other end and attach it to the rim with a nipple; you don’t have to tighten it yet, just enough for it to hold. You should insert the spoke via the second hole to the right of the valve; we will now refer to this as our starting spoke.
- Insert the seven others into flanges in the same way, but skip one flange every time; this will leave an empty flange between the inserted spokes. Attach the rest to the rim but keep three holes between them.
Step 3: Work on the non-drive side
Turn the wheel over; you will now have the drive-side facing away from you. Now, you’ll be inserting spokes for the non-drive side.
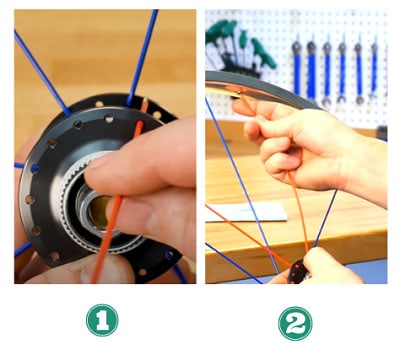
- Go back to the starting spoke and identify the flange on the non-drive side that is to the right of it. Insert the first of the next set here, again from the outside.
- Place the rest of the set while maintaining an empty flange in between. You’ll notice that each one will be to the right of a drive-side spoke. Attach them to the rim using the hole to the right of the drive side spoke near each one.
Step 4: Set from the inside
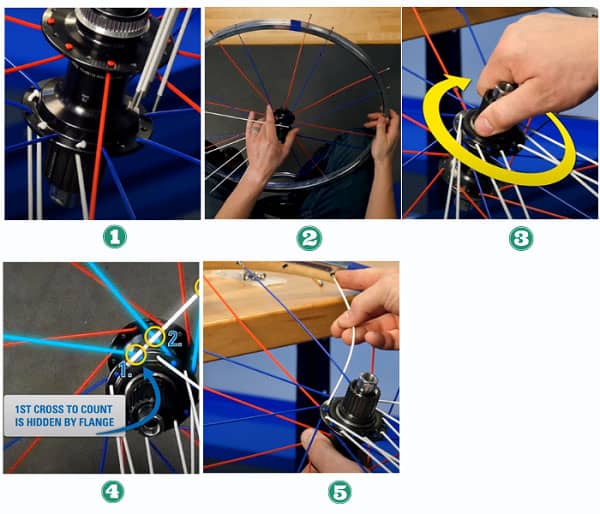
- Insert the next eight spokes into the drive side from the inside; this will be easier with the non-drive side still facing you.
- Turn the wheel over once all of them are inserted. Make sure that the spokes you’ve just inserted are lying flat against the wheel. Hold the hub and turn it clockwise – you’ll see the lacing begin to take shape.
- The installed spokes now turn to the left, take one of the newly inserted ones and move it to the right. Count the number of other spokes it crosses as you move it; only count the ones on the same side. Stop when you get to the third one.
- Tuck the spoke you’re holding under the third one it crosses then bring it to the second hole after the third crossed spoke; fasten it here. Proceed to do the same for the rest.
Step 5: Last set lacing
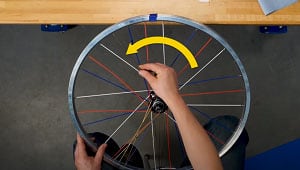
- Insert the rest of the spokes into the remaining flanges again from the inside, and then turn the wheel over. Take one spoke and bring it to the left while counting the number of crosses made. Much of this process is the same except for bringing the spokes left.
- Once more, tuck each one under the third installed spoke it crosses. Install using the next available rim hole after crossing the third. Check to see that all of them have been fastened properly.
Step 6: Tightening the nipples
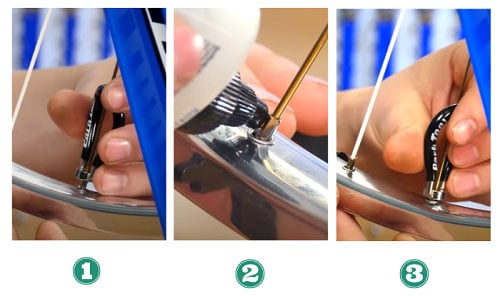
- The lacing is complete, but the spokes on a bike wheel at this point are still loose, so tighten each nipple until no threads are left visible for each.This process will be much easier to do if you use a wheel stand, but you could also use a frame placed upside down.
- Lubricate each spoke at the point where it is secured in place by the nipple. Spin the wheel to allow the lubrication to spread.
- Adjust the tension with a spoke wrench, but be sure to use the same number of turns for each one. This is assuming that you are using differential ones where spokes on the drive side are shorter than those on the non-drive side.
For differential spokes, the wheel’s drive side should receive two extra turns.
Step 7: Truing
The next part of building a bike wheel is truing, which involves three things; radial trueness, lateral trueness, and rim dish trueness.
- Radial trueness refers to how the hub must be at an equal distance to the rim on all sides. This should not be a problem if the spokes are all the same length and the nipples have been tightened a similar amount.
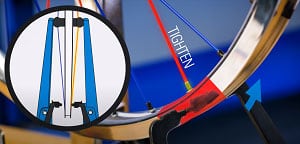
- Lateral trueness refers to the wheel shape. If the wheel is not laterally true, the wheel will look like it wobbles from side to side as it spins. Adjust this by tightening the right side spokes to bring it to the right, or the left side ones to bring the rim left.
You can also adjust lateral true by loosening one side to move to the opposite side, but tightening is preferred. It takes a lot of trial and error, but keeping to small adjustments will work out.
- Rim dish trueness refers to the rim being centered in reference to the hub. Similar to radial trueness, this should be fine if the spokes are all the same length and adjusted similarly. The correction is made by tightening all nipples for the spokes on the side where you want to move toward.
Step 8: Apply equal tension
The last part of bicycle wheel building is to measure the tension and ensure that all spokes are as close to identical as possible. Begin by first referring to the recommended tension setting for your rim.
- But first, grab the spokes in pairs on each side, then squeeze them by hand. This will cause them to stretch and settle into the flanges.
- Each spoke will need to be measured at the same section to ensure that an accurate comparison is made.
You can use a tension meter, but if you don’t have one, you can also estimate by feeling it with your hand. Use your thumb and index finger to try separating the spokes where they cross, and take note of how far you can spread the spokes. Do this for the rest of the spokes. Note that if they move by 1 mm, they’re too slack.
It doesn’t need to be 100% accurate, so just do your best to make the tension setting as close to uniform as you can.
Frequently Asked Questions
How hard is it to build your own bike wheel?
Building your own wheels is very difficult since it requires a lot of time and effort to complete. However, it is also a very rewarding project to undertake, not to mention the value of being able to customize a wheel according to your needs.
Is it cheaper to build your own bike wheel?
It depends. Wheels that use high-quality materials are expensive, and building one yourself may help save costs. However, if you’re looking for something as cheap as possible, then building your own may not necessarily be more economical unless you already have the parts on hand.
You can get wheels for as low as $30. So, shelling out more than that for parts and the amount of work involved may not be worth it if the price is the most important thing to you.
How much does it cost to build a bicycle wheel?
The basic wheel building cost would be around $200 if we’re looking at parts alone. Buying tools will increase the cost quite a bit, especially if you need a stand or measurement tools.
Conclusion
Now you know how to build a bike wheel using individual parts. Aside from having the knowledge necessary for a bicycle wheel builder, this can also come in handy when respoking a bike wheel during maintenance.
Have you ever tried assembling other bicycle parts yourself? Which bike part do you think would take more time and effort to complete than the wheel? Tell us your thoughts in the comments section below.
Read more: Tips to build a bike ramp.

“I ride my bike to work for years, but is that enough? Our carelessness towards our surroundings has taken a toll on the environment. And now, everyone is responsible for changes; even the most minor contribution is counted. With this hope and spirit, I started with my partner to establish Biketoworkday to help more individuals commute to their work sites on their bikes.”