A bike pump is one of the most reliable repair tools a bike owner should have. It is your go-to device when the bike tires get flattened, and you need to inflate air into the tires. Most of the bike pumps today are operated manually and require some basic repair skills.
As a responsible cyclist, it is essential that you know how to use a bike pump in order not to damage your tires. Thus, we prepared a simple guide to teach you how to operate a bike pump properly to keep your bike tires full and always ready for road adventures.
It includes opening the valve, attaching the head and the bike valve, putting in the right pressure, and so much more. For details, read on as we show you how you inflate your tires successfully.
Table of Contents
- What is a Bike Pump
- A Step-by-Step Guide to Using a Bike Pump
- Step 1 – Picking the right bike pump
- Step 2 – Putting in the right pressure for the tires
- Step 3 – Remove the valve dust cap
- Step 4 – Prepare your valve by opening it
- Step 5 – Attach the pump head to the valve
- Step 6 – Use your head to ensure that the attachment is fixed and stable
- Step 7 – Apply the optimal pressure to inflate your tire
- Step 8 – Remove the pump head
- Step 9 – Check your tire and start riding
- Conclusion
What is a Bike Pump
Bicycle pumps are manually operated devices responsible for inflating your tires. They are normally lightweight and capable of filling air into the tires in a matter of minutes. Most pumps are easy to operate, as well.
Bike pumps compress air by pressing the air down the tube of the pump using a valve. The Presta valve will open because of the air pressure, and let the air fill-up the tire. Once the air inside the tire gets full, the valve will instantly shut off to prevent air from coming out.
Some pumps are straightforward to operate, wherein you get a display of the tire pressure being enforced on the tires. Once you achieve the right amount of air and pressure, you can easily remove the pump valve from the tire. You can either use Presta valves or Schrader valves, which are both available in the market.
In order to get the most out of your road bike pump, it is important to consider the following factors when choosing a pump:
Pressure
The number one factor that you should always look at is the pressure needed by your tires. It is vital to assess what type of bike you have and the pressure it needs to get inflated. Mountain bikes only require less than 40psi for air pressure. Do not go beyond this standard psi in order not to give too much volume output to your tires.
Gauge accuracy
Looking for a gauge accuracy in a bike pump is equally important. It helps you supply the right amount of pressure your tire needs. Using a readable gauge, you can determine whether you are putting high pressure and low pressure into the tires. In this way, it will help prevent damaging your tires in the long run.
Pump heads and valves
Bike pumps today require the use of the Presta valves and Schrader valves. So it would be great if you know what kind of valve your tire needs to prevent it from being damaged. There are different styles of valve heads that you should consider before getting one.
You can choose the twin-valve head, smart head, and thread-on style head. The twin-valve head basically has two separate slots for either kind of valve. The smart head is more versatile to use on one side because this type of valve can adjust automatically based on the valve size. Lastly, the thread-on style is customizable, where you need to flip and change it depending on the valve requirement.
Volume output
Of course, the volume output should always depend on what kind of bike you have. Getting a high-volume pump means you need not put in too many strokes to hit the right pressure for your tire. If you own a mountain bike, you need to get a type of pump with greater volume to meet its tire needs. For tubeless tires, huge volume output is required to put in the tire pressure without using a compressor.
Size
Size is another factor that you should not miss when choosing a bike pump. If you are only using it for bicycles, choose a hand pump so you can manually control the pressure you put into the tire. Do not get a bike with the smallest size, though it can inflate your tire eventually; and you would exert more time, and energy with it.
Weight
Most bike pumps are lightweight. But if you want a heavy-duty and more sturdy kind, you can also find some in the market. They won’t topple over and keep the pump more stable. Nevertheless, lightweight pumps are more expensive than heavier ones. They are made of aluminum or carbon fiber materials to ensure their durability in spite of their lightweights.
Construction
Bicycle pumps come at different construction and prices. Depending on the material used, the pricing will directly vary. Metal is one of the most durable materials a manufacturer can use for a bike pump. If the pump contains more metal, meaning the price can be higher, as well.
With metal construction, the product is more solid, steady, and long-lasting.
Serviceability
If you want to invest in high-quality pumps, you take into account serviceability. Meaning, when it gets damaged, you can easily look for service centers that can repair it. Also, the components and spares should be readily available on the market.
Once you already considered these factors for getting the right bike pump, here are the easy to follow steps on how to pump bike tire:
- Picking the right bike pump
- Putting in the right pressure for the tires
- Remove the valve dust cap
- Prepare your valve by opening it
- Attach the pump head to the valve
- Use your head to ensure that the attachment is fixed and stable
- Apply the optimal pressure to inflate your tire
- Check your tire and start riding
In the next section, we will guide you through every detailed bike pump step.
A Step-by-Step Guide to Using a Bike Pump
Step 1 – Picking the right bike pump
There are different bicycle pumps available today, including the manual operated bike pump, hand pump, floor pump, or tube pump. You can either use the Presta valve or the Schrader valve. But, remember no matter what type of pump you choose, the most important consideration is its compatibility with your tire valves. As if you use a bike pump that is not really compatible with your tire valves, you can not get most out of your bike pump.
To know the kind of valve your bike requires, start inspecting your tires, and assess the valve’s physical attributes. As mentioned before, there are two types of valves, which are Presta valves or Schrader valves. So, if you find the valve narrow and a bit tall, it is definitely a Presta valve. In case you see a wider black valve, then it is a Schrader valve.
Assisting the proper type of valve and choosing the right pump for it can make a huge difference. You can avoid damaging your tire, and inflating your bike tire can be so much easier. In case you do not have the right pump with the correct head, you can opt to use an adapter normally available on the market.
Step 2 – Putting in the right pressure for the tires
As we have mentioned earlier, bicycle pumps provide high pressure which can certainly damage your bike tires. It is vital that you assess your bike tire first, and how much pressure it can hold. Of course, large bikes can accommodate more tire pressure than smaller ones. But, it would not require a bike pump that can input pressure similar to car tires.
Moreover, identify the proper pressure range your tire needs to be inflated. In this way, you can avoid over-inflation, which would directly damage the tires. It is essential to check the sidewall of your tire where you can see the recommended PSI range for your tires.
In most cases, the regular road bikes need 80psi – 130 psi, while mountain bikes need 25 psi – 35 psi.
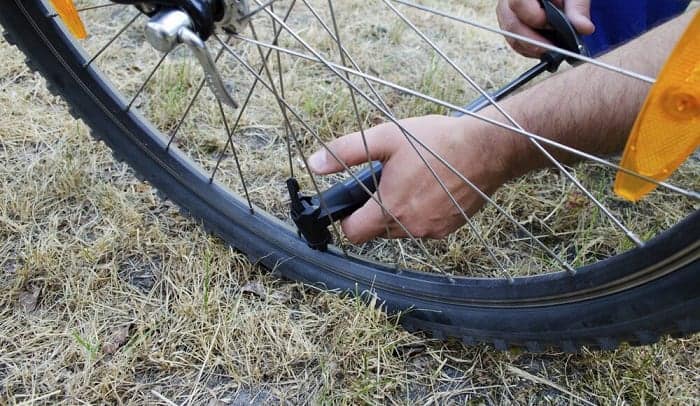
Step 3 – Remove the valve dust cap
To protect your bike from dirt and unnecessary elements, manufacturers put a dust cap on the bike valve. Before inflating your bike, ensure that no dust cap or plastic cap is surrounding it. If you find one, you can rotate it counterclockwise, unscrew and remove it from the valve.
Step 4 – Prepare your valve by opening it
If the bike has a Presta valve, open the valve so you can attach a bike pump for inflation. Unlock the nuts at the top of the valve, and unscrew and open the valve for pumping bike tires. If you find it hard to unlock, you can use pliers to help you with the process. A pair of pliers can slacken the nut making it easier for you to open the Presta valve.
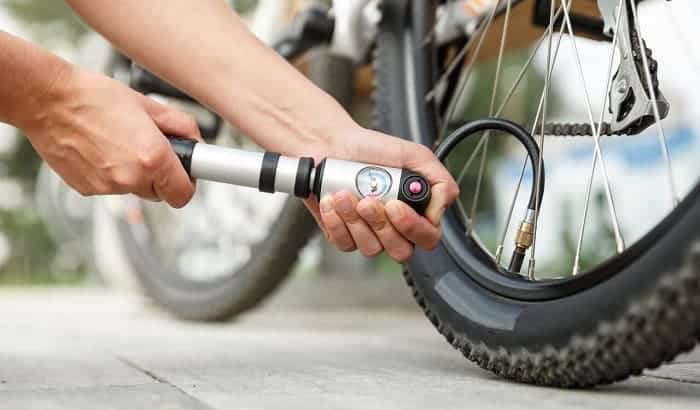
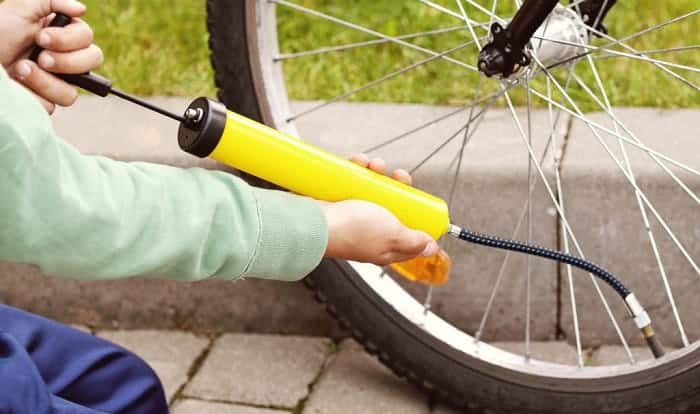
Step 5 – Attach the pump head to the valve
After opening the valve, you can now start attaching the pump head to the valve to start inflating the tire. To do this, you should press the pump’s nozzle in a downward direction so it can join steadily to fit the valve. After which, place the nozzle firmly by lifting the pump’s lever to a 90-degree angle.
Ensure that you pull up the lever properly so that no air pressure can pass from the tire. You can determine that the pump head is correctly in place when there is no amount of air or tire pressure seeping into the valve.
In case you observe that the tire is not expanding, you have attached the pump head incorrectly into the valve. You have to repeat the process, and remove the head onto the valve and reattach it again.
Step 6 – Use your head to ensure that the attachment is fixed and stable
Once you observe that the valve and pump head are fitted well, you can now continue pumping up bicycle tires. To make the fit more durable, use your hand to hold the head steadily on the valve. This will ensure that the attachment is secure, and will not fall off in case you add more pressure while using the bike pump.
You can pump the bicycle tire steadily, and touch the tire from time to time to check whether the air pressure is of the right amount.
Step 7 – Apply the optimal pressure to inflate your tire
Once you are sure that the valve and pump head is fixed and stable, you can now apply the maximum pressure for your tire. Remember that you have to refer to the right psi needed by looking at the tire’s sidewall.
If your bike pump has gauge accuracy, check whether you are pumping in the right amount of pressure. Using the pressure gauge, you can identify the amount of air going into the tire, and how much more is needed to inflate it fully.
In case your bike pump lacks that pressure gauge, use your thumb to determine whether the tire is fully inflated. You just need to grip the tire from both edges, squeeze it, and check whether it already achieved the right firmness. The level of stiffness will help you know that you completed inflating your bike tire.
Step 8 – Remove the pump head
You can now remove the head once you achieve the right pressure, and your tire is completely inflated. To do this, you can flip the switch on the pump’s head, then loosen the nozzle, and fully remove it.
After, you can now tighten the locking nut in a clockwise direction to ensure that no air will slip from the tire. Ensure that the lock nut is secure, and put the dust cap again onto the valve.
Step 9 – Check your tire and start riding
If you want to know whether you successfully inflate your tire, you can check your bike wheels by riding it. Once you can ride comfortably and do not feel any off vibe on your wheels, you have fully inflated your bike property.
Conclusion
Tires tend to lose air, especially when you use them repeatedly. Luckily, there is an available bike pump out there which you can buy and inflate your tires on your own. Using a bike pump may be straightforward, and seems to be simple, but if you do it wrong, you might heavily damage your bike tires.
Thus, we prepared this guide to give you the most basic knowledge about using a bike pump successfully. We keep the steps simple and easy to follow, as well. Nevertheless, may you find this guide helpful without seeking professional help in inflating your tires.
So if you found this guide on how to use a bike pump helpful, feel free to share it with everyone. In case you have any questions or suggestions, you can comment below and leave something for our discussion.
Furthermore, in case the bike pump is not available, you can learn more about our guide for more how to pump a bike tire without a pump. And other relevant tips that you might be interested in, such as measuring, and changing tires.

“Bike commuting should be the trend for the next few years, and it is a convenient and eco-friendly way for us to travel. And we are here to make it a bit less troublesome for people who want to maintain their vehicle for a long time. So, the content I expect to put out here is offering help for bikers who are facing issues with parts of their bikes once in a while. Let’s have fun and protect the environment together!”