
Is your kid somewhat uncomfortable by the height of his or her handlebar? Then as a parent, it’s about time to prioritize your child’s comfort and adjust the handlebar to avoid unwanted accidents.
We compiled all the important insights to that end, giving you an efficient way to achieve your goal. Stay tuned to know everything, from the tools up to the actual process.
Knowing how to raise the handlebars on a child’s bike can raise your child’s comfort to a whole new level. Find the Right Tools
You would have to unscrew, adjust, and tighten the handlebar back to its place. For this part, I will lay bare the tool you need to solve the issue at hand, and it is one of the following.
The difference lies in the type of nut present in your bike.
- Allen wrench – you can easily find this type of wrench in your home toolbox. It will come in handy when you’re about to deal with a lowered hexagonal socket.
If your child’s bike does not have a hexagonal socket, then it’s more than likely that you will need this one:
- Adjustable rent – an adjustable rent is used for a protruding nut in your bike handlebar.
Pro Tip: I recommend ensuring that you have just the right tool size and that your Allen wrench perfectly fits the hexagonal socket for it to work smoothly and properly.
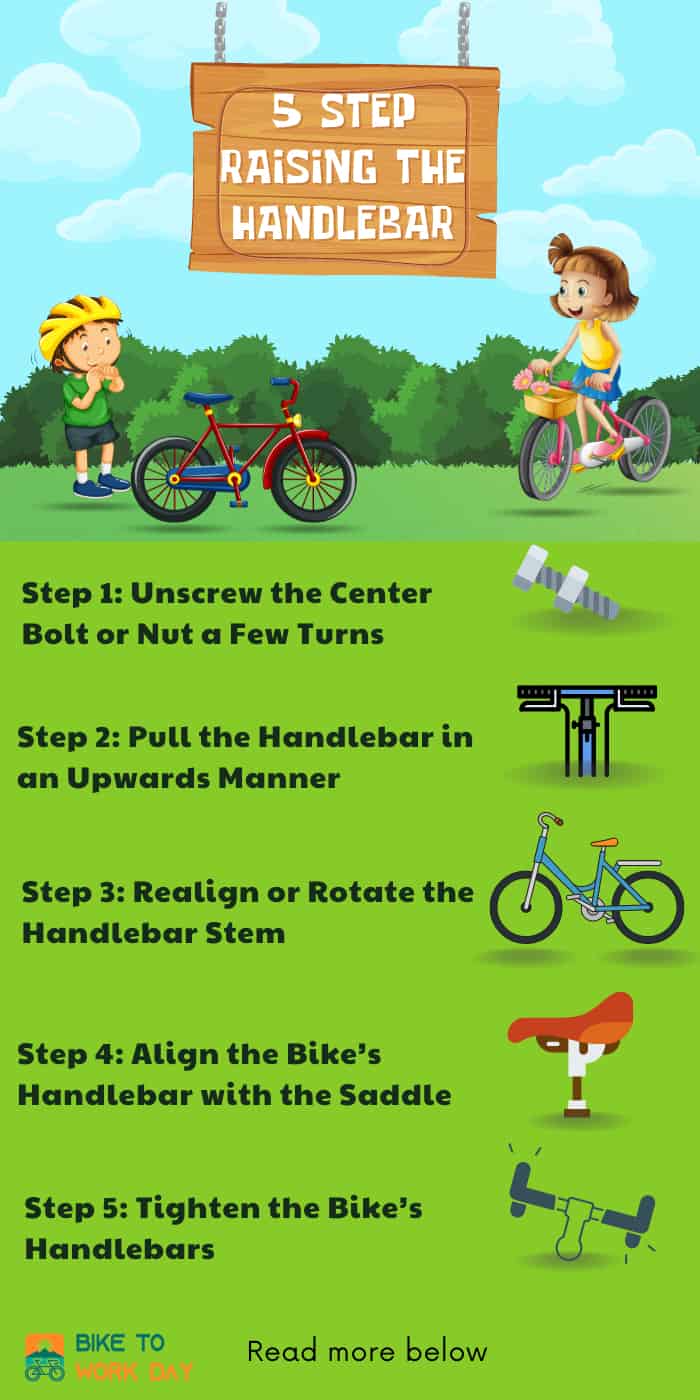
Table of Contents
Raising the Handlebar

Let’s now proceed to the real deal of raising your child’s handlebar. I kept the steps easy and simple, so you won’t have a hard time following this technical process.
Step 1: Unscrew the Center Bolt or Nut a Few Turns
Provided that you have found all the necessary tools to start making your child’s ride more comfortable, the next thing to do is to determine which type of bolt or nut the bike has and loosen it using the appropriate tools.
A good habit includes checking the top-middle portion of the bike stem. This center of the handlebar usually comes with a nut, which you should observe.
If you see a protruding nut, you will have to use one adjustable rent. However, for a hexagonal socket with a sunken bolt, I highly recommend an Allen key or what is known as an Allen wrench.
Unscrew the bolt using the tool in several turns until you notice that the nut feels loose. But, do not dismantle it yet!
Loosening it is more than enough because removing it completely from the bike will make your reassembly more challenging once the process is done.
Step 2: Pull the Handlebar in an Upwards Manner
For the next step, you would need to pull the bike handlebar upwards in a meticulous manner until your child would have the desired height for his or her use. You can straddle the bike’s front wheels while pressing it using the strength of your legs.
In this way, you can effortlessly lift the handlebars in no time and you can proceed to the next step with no worries.
Pro Tip: Do this step slowly and avoid instant or drastic pulls to avoid bike damage.
Step 3: Realign or Rotate the Handlebar Stem
Although this step is optional for some, I still highly recommend realigning and rotating the handlebar.
Why do we need to realign?
Well, the answer is simple. Aligning the handlebar ensures proper orientation, especially since the bike might have gone sideways during the first process.
Just like the second step, you also have to do this one carefully and firmly to stop the bike’s handlebar from getting pulled out.
Step 4: Align the Bike’s Handlebar with the Saddle
The next thing that you should align the handlebar with is the saddle. Do note that the handlebar can be above, equal, or just below the bike’s saddle.
This is a crucial adjustment because improper adjustments would result in more load on the fingers and wrist. This can be a hazard when cycling on a rough road or off-road trails.
The position of the handlebar depends on the type of ride you are preparing for, whether it’s for a race, an off-road trip, or just occasional cycling at the park. Typically, handlebars below the saddle are intentionally designed for racing purposes.
A little bit above the saddle is a comfortable position for recreational biking, such as a ride in the park. However, you would not want the stem too high because it usually causes your children to incline backward, affecting their steadiness and triggering back strains.
In choosing the right handlebar height, ensure that the saddle’s height perfectly fits the sitting height of your kid. He should be able to flatten his feet on the ground when he sits on the bike saddle.
If the saddle is already in the right position, make sure the handlebars are slightly under or at the same height as the saddle.
Take a look at this video to increase your knowledge about this particular adjustment.
Because we’re down to handlebar adjustments, I want to share with you this simple tip on the proper way to raise a handlebar on a Threadless Headset Stem, which may come in handy if your child’s bike has this particular design.
You will rarely see a threadless handlebar that allows variations because there is no additional slack other than what you see. Nevertheless, raising or lowering this is still possible within its given capacity.
To accomplish this, you will have to loosen the stem cap first, which is the standard procedure with all handlebars. You can then add or get rid of the spacers.
So, what are spacers?
Spacers are compact rings that prevent the stem from going lower than what your kid desires. Running out of spacers is a common problem. However, you can always buy more at a local accessory store near you.
Pro Tip: As we adjust our kid’s bike handlebar height, we always seek our children’s comfort and proper posture. As a parent, I always make sure that my child feels comfortable when riding his bike. This will help him appreciate that biking is fun.
Regarding the posture, I also take into account the same belief.
We all know that bad posture usually costs us troubling body issues over time. And we all don’t want our child to suffer that. That’s why I always ensure that my kid will have the proper posture when riding his bicycle.
Step 5: Tighten the Bike’s Handlebars
Finish off by screwing the joints to secure the bike handlebar firmly and stop it from fidgeting. Also, see to it that the bell’s position is right and that your kid can embark and disembark the bike with no worries.
After these simple steps, the next thing to do is to observe your son’s posture when he rides the bike. Does he slouch or not?
When you do not see your child slouching during his/her bike ride, it is more than likely that he or she is content with the handlebar’s height.
Pro Tip: Find the smallest insertion mark on your kid’s handlebars. Ensure that this line stays inside the bike stem when adjusting the handlebars.
Conclusion
And that’s it! You now have adjusted and successfully elevated your kid’s bike handlebars, threadless or not.
With this, you will never have to spend money just for minor handlebar elevation. Your kid will definitely thank you as you made his ride more comfortable and safer.
Did you enjoy this easy and simple tutorial? What was your experience while adjusting? Share it in the comments. We’d be very happy to hear it!

“Bike commuting should be the trend for the next few years, and it is a convenient and eco-friendly way for us to travel. And we are here to make it a bit less troublesome for people who want to maintain their vehicle for a long time. So, the content I expect to put out here is offering help for bikers who are facing issues with parts of their bikes once in a while. Let’s have fun and protect the environment together!”