Owning a bicycle will bring you to a point where taking it apart and putting it back together are useful things to know how to do. However, learning how to remove your bike fork could be daunting, seeing how interconnected it is to other parts.
Let’s take a step-by-step look at how to go about this. This is an essential step when replacing bicycle fork or performing a bike tune-up so it’s useful knowledge to have, especially if you’d like to save on professional fees.
Keep reading to learn more.
Table of Contents
What You’ll Need
Ways to Remove Fork From Bike
There are two types of forks found on bicycles, the threadless and threaded types, and we’ll cover how to remove each one. Before beginning to remove the front fork road bike should be secured using a stand or with a helper to make things more manageable.
Removing bicycle fork with threadless system
Step 1: Remove the front wheel
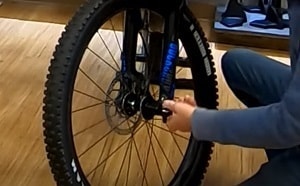
The fork is located at the front of the bicycle, with the front wheel at the bottom and the handlebar at the top. The first step is to remove the wheel, which applies when you remove fork from road bike or from MTB.
- If you don’t have a quick-release axle, you will need to use an Allen wrench to remove the wheel. Insert the Allen wrench, be sure to use the correct size, and then turn the wrench counterclockwise to loosen it. Once the bolt comes off, pull the axle out.
Should you have a quick-release axle, this will take just a few seconds. Just turn the lever anti-clockwise until it comes off. Pull the thru-axle out, and the wheel will come off.
At this point, you can remove the front wheel from the bike.
Step 2: Remove the front brakes and stem
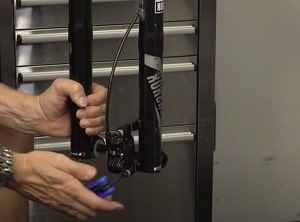
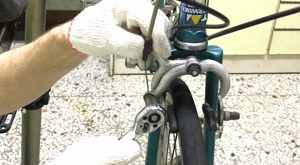
The brake also needs to be detached from the fork. We’ll need to unscrew the caliper and then follow the brake cable up the fork and remove each screw securing it in place. Put the bolts away neatly to avoid losing them. Then, loosen the clamps holding the stem in place.
Note that it’s important to do this in order. If you instead remove the cap at the top first, the fork will fall out since there will be nothing left to keep it connected to the frame. This can result in damaged parts, especially if the fork falls from a great height.
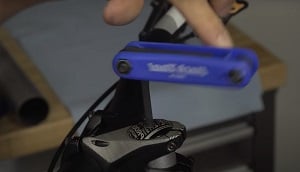
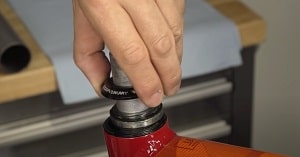
At the top side of the stem, you’ll find the cap that is held in with a bolt. Hold onto the fork and use your Allen wrench to remove the bolt securing the top cap.
Step 3: Remove the fork
After removing the stem, the spacers that set the height of your handlebars are left on the tube; remove these. You can also take off the headset plate beneath the spacers.
You can now see the inside components of the frame from the top: a washer, compression ring, and bearing ring. Take these out, then prepare to slide the fork out underneath.
Note the order that these came out by making an assembly diagram or placing them correctly as they are set aside. A replacement bicycle fork may not come with a set of bearings, so setting these aside is the safer bet.
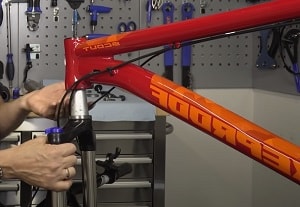
Pull the fork out; watch out for another set of bearings and washers that may slide out of the bottom along with the fork.
If you want a visual demonstration, here’s a tutorial video you’d find helpful.
Steps to Remove Threaded Bike Fork
Step 1: Remove the front wheel and headset
The first step to remove the fork from old road bike or any unit with a threaded stem is to remove the front wheel and brakes. As for your fork removal tool, a set of Allen keys and a wrench should be enough, but it also helps to have oil or lubricant in case any threading refuses to budge.
Wheel removal is similar to when you remove a bicycle fork that is threadless. Next, move to the top of the frame.
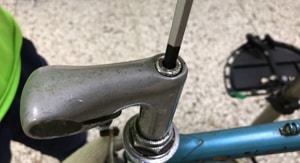
Loosen the lock nut at the top of the frame, then remove the bolt securing the headset at the top of the front tube. This will be enough to remove the headset, which is partially inserted into the frame. Slide the whole thing out.
Step 2: Remove the lock nuts and components securing the fork
The lock nut that we loosened earlier is still keeping the fork in place. This time we’ll need to remove it entirely. Turn it with a wrench until the nut is off completely.
You’ll find a few more things under the lock nut, which you’ll also need to thread out along with washers and seals. It’s best to note the order that these are taken out; this will help when you re-assemble and install a bicycle fork. Once everything on the top side is taken off, you’ll see the inside bearings of the frame.
The threaded fork will have a top and bottom set of bearings you should not lose. Old bike bearings are likely to be loose though, so take care not to accidentally drop anything while removing the internals.
You can now slide the fork out from underneath the frame; take care not to lose or drop the bearings on this side.
To have a better idea of what steps to take, you can check out the tutorial video below:
Conclusion
Now you know how to remove your bike fork, this brings you closer to being able to take apart the entire frame. It’s useful to take pictures of bicycle front fork assembly if you’re not confident about being able to put everything back. Be thorough when proceeding with disassembly, and you’ll do just fine.
What parts of the bicycle are you intimidated by tinkering with and why? Tell us your thoughts and comments in the section below.

“I ride my bike to work for years, but is that enough? Our carelessness towards our surroundings has taken a toll on the environment. And now, everyone is responsible for changes; even the most minor contribution is counted. With this hope and spirit, I started with my partner to establish Biketoworkday to help more individuals commute to their work sites on their bikes.”