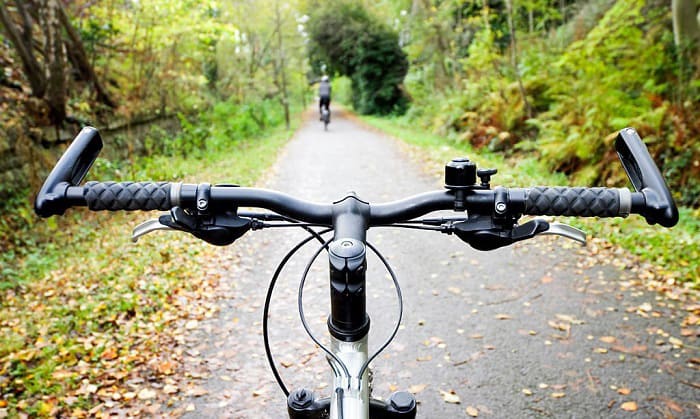
If you can’t ride your mountain bike without straining your elbows and shoulders, then handlebar height adjustment might be just what you need.
To raise bike handlebars is an easy and affordable way to improve your ride. The increased height will surely give you greater control while moving down each bumpy trail.
Learn how to raise the handlebars on a mountain bike through the steps below.
Table of Contents
- Step-by-step Instructions
- Method #1: For Mountain Bike Threadless Headset
- Step 1: Loosen the stem screws
- Step 2: Make the appropriate adjustments
- Step 3: Leave a gap between the steerer tube and your stem
- Step 4: Tighten bicycle handlebars
- Step 5: Align your handlebar with the front wheel
- Step 6: Try and test your newly adjusted handlebar
- Method #2: Threaded Mountain Bikes
- Step 1: Loosen the bolt and nut
- Step 2: Repositioning and reattaching the stem
- Why You Might Need to Adjust Your Handlebars?
- Helpful Tips
- Conclusion
Step-by-step Instructions
There are a lot of factors to consider when adjusting handlebar height on your mountain bike. But the most important step is to determine whether your bicycle is sporting a threadless or threaded headset stem.
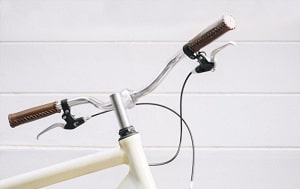
- Threaded (Quill) headset – The quill stem is secured onto the headset with a lock nut, spacers, and threaded top race.
- Threadless headset – The stem is secured with a top cap and pinch bolts and is connected to the steerer tube.
Once you know the type of handlebar you have, follow the correct method below.
Method #1: For Mountain Bike Threadless Headset
What you’ll need
- Allen Keys
- Handle Bar Spacers
- Torque wrench or pre-set Torx keys for carbon fiber frames
- Hammer – optional for quill stems
- Straight edge
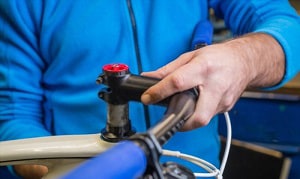
Step 1: Loosen the stem screws
Locate the screws on a bike stem and loosen each one of them using your Allen keys or multi-tool. Remember to keep the screws in a secure place so as to not lose them.
Once removed, you should be able to pull out the stem of your bicycle with no effort.
Step 2: Make the appropriate adjustments
Using the spacers for handlebars you have at hand, add in as many as you need and mix and match the spacers according to your liking. You can get packs of spacers with various sizes from 3mm up to 20mm.
Don’t just blindly choose a random spacer; try multiple before settling on the height that you are most comfortable with.
Step 3: Leave a gap between the steerer tube and your stem
Having your stem flushed with the steerer tube is not what we want. You need to have a little gap of about 3mm to 5mm, since we have the top bolt and cap to put in place.
Step 4: Tighten bicycle handlebars
Once your gap is there, tighten the top cap first and the stem bolts on the side second. Make sure that you secure everything to avoid unwanted clutter mid-ride; go for a quarter turn at a time for easy adjustment.
Step 5: Align your handlebar with the front wheel
Check the alignment of your stem with your front wheel. You can place a straight edge parallel to the front wheel’s axle, then get on the bike and make sure the handlebar parallels the straight edge.
Step 6: Try and test your newly adjusted handlebar
Move the steerer back and forth, and left and right to see if there are super tight bolts, overly loose screws, or any misalignment issues.
Feel free to repeat the steps above until you are satisfied with the height and the performance of your handlebars.
Method #2: Threaded Mountain Bikes
What you’ll need
- Allen Keys or a multi-tool
- Wrench – optional if your handlebars are equipped with a hex nut
Step 1: Loosen the bolt and nut
Unscrew the bolt and lock nut using an Allen key and a wrench, respectively. At this point, the stem should be adjustable.
Step 2: Repositioning and reattaching the stem
Depending on the style of riding, simply raise handlebars on mountain bike and mark the exact point of the handlebar height that you are most comfortable with.
Once placed, tighten the locknut and bolt cap in place until your handlebar is secure and moveable with no abnormal action whatsoever. Your threaded stem should not loosen or give you a hard time with turning mid-ride.
Why You Might Need to Adjust Your Handlebars?

There are several reasons why you might need to adjust the height of your handlebars.
1. Bicycle handlebar extensions for comfort
Your handlebars are adjustable, so you can change the height of them for a better fit and comfort. This is especially important if there’s an issue with shoulder pain or soreness from riding too long in one position or from being too hunched due to low handlebar height.
2. Better visibility
A common complaint among mountain bikers is that they don’t see as well or move their head as easily as they would like when riding downhill.
Bicycle handlebar extensions can help improve visibility by helping riders maintain the right posture.
3. Height growth
If a bike’s handlebar can change, so does a person’s. Adjusting the position of a handlebar is necessary when the rider becomes taller or when regifting the bicycle to someone who is shorter.
Helpful Tips
How To Find The Perfect Handlebar Adjustment?
You may have never known the comfort handlebars can provide if you don’t have an idea of the best height to use.
The best step to start with is leveling your MTB handlebar height relative to seat or saddle height. Once adjusted, try and test out your handlebar as you may have to drop it down to 3 inches or lower, depending on your stature.
It is important to find your own preference through trial and error, since not everyone can just whip up a formula for the ideal adjustment.
How Wide Should My Mountain Bike Handlebars Be?

Your handlebar should be proportionate to your body size in order to avoid discomfort and muscle soreness.
If you have a broad shoulder, then a wider handlebar may suit you just fine. One sizing method to try is multiplying your height (in mm) by 0.44 if you’re male and 0.426 if you’re female.
Apart from the body size, you may want to look into the type of discipline that you will ride.
For example, downhill bicycles could use at least 760mm – 800mm to provide more space for power steering.
On the other hand, cross-country bikes may prefer narrower handles with 680mm-740mm widths to help with speed and uphill courses.
Lastly, Enduro bikes will need handlebars of 740mm – 780mm that offer stability.
How To Find The Perfect-Sized Handlebars For Your Bike?
The mountain bike handlebar height should cater to one’s body; thus, the rise of the bicycle is determined by what makes you comfortable. For instance, a tall rider may need more rise than a short one.
Take note tha= MTBs with flat bars may have zero rise; compared to upright handlebars or cruiser types, they are less ergonomic, though both are moderately comfortable.
You should also consider the handle grips – particularly, their upsweep or backsweep. Generally, an upsweep of 4 or 5 and a backsweep of 8 are best.
Can You Raise The Handlebars On Any Bike?
You should be able to raise bicycle handlebars to fit your needs and provide proper comfort.
Just check your type of handlebar, educate yourself about it, and read the adjustment instructions. You should be able to freely adjust this component, whether on specialized mountain bike, road bike, and even a child’s bike, whether it’s an Apollo bike or any other brand.
Conclusion
Raising your handlebars might not be something you do every day, but if you need to do it, it is relatively easy.
Now that you know how to raise the handlebars on a mountain bike, try it and find the best setting for your cycling style!

“I ride my bike to work for years, but is that enough? Our carelessness towards our surroundings has taken a toll on the environment. And now, everyone is responsible for changes; even the most minor contribution is counted. With this hope and spirit, I started with my partner to establish Biketoworkday to help more individuals commute to their work sites on their bikes.”