Have you been in a situation where you thought that your bike measurements were accurate when they were not? That’s one of the many challenges you face when measuring a stem. Luckily, this article will teach you how to measure a bike stem correctly.
This will help you get the proper measurements for optimum performance and comfort throughout the road.
To do this, you must measure the gap between the two vertical points above. Keep reading and know more about the process.
Table of Contents
What You Need
You will only need two things that will help you with bike stem sizing:
- Tape measure, like the Kutir Measuring Tape.
- Bike Stand
A rider doesn’t need much in measuring a bike quill stem.
How to Measure a Bike Stem
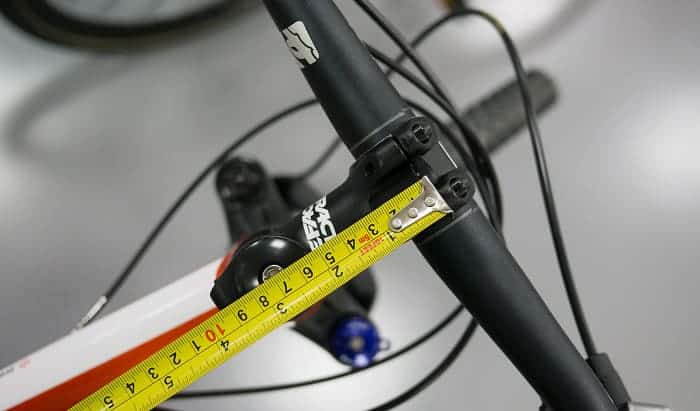
A mountain bike stem, or any stem in particular, is measured from the center of the headset stem to the center of the handlebar.
Stem length is an essential aspect of bikes that can affect your body comfort and performance on the road. It is vital to know the present length of your bike stem before you can change it.
A stem measured length is usually assigned in millimeters, and you can sometimes see this indicated on bikes. However, there are still stems that do not put out their length measurements, so you have to determine them yourself.
Step 1: Stabilize your Bike
The first thing to do is to place your road bike against something firm. Putting it against firm support will give you access to a good stem angle and position that may be useful for the bike stem measuring process.
You can stabilize your bicycle frame by putting it in a trainer or a bike frame stand. However, if these tools are not available, you can always position your bike frame against the wall or something firm.
Step 2: Start Measuring the Length
Length is very influential to the stem. Before you measure bike stem length, know that its stated length is not the same as the length of the whole stem from its front to back.
Know the length by measuring from the middle bolt of the bike’s headset top to the center of the handlebar. Ensure that you measured the length in centimeters or millimeters. A bike stem length usually runs in 10 mm increments and starts from 70 mm to 140 mm.
Do know that the measurements you get are possibly off by a few millimeters. That’s the reason why you must adjust the measurement to the closest 10 mm increment.
These two steps are the only thing you need to do to accurately measure stem length and never experience spending money on inaccurate measurements of a bike stem.
Note: A threadless stem is somewhat unique compared to a threaded stem, and the difference lies in their steerer tube. Regardless, a threadless stem and a quill stem both have rise and drop, which are measured in degrees. You can have a positive or negative stem rise/drop.
Things to Consider When Picking Bike Stems

1. Know the Reach
Reach must also be prioritized. A bicycle with insufficient reach is usually uncomfortable as it causes cramping.
This is why every bicycle’s top tube length is also crucial to consider for your stem. It will tell you how far you could go before you meet any negative handling traits.
I do not recommend putting a little stem on bikes with a shorter top tube as it would not end in smooth control and a good riding position. Think of it as being on a bicycle that is way too tiny for you.
In fact, you may even struggle in riding terrains because there’s a big chance that you get lop-sided from being in an upright position while riding.
A good mtb stem length is somewhere between 50 mm to 80 mm. It’s a reputable guide to remember.
2. Determine the Bike’s Rise
Next to consider is the rise. Stems have different amounts of rise, also known as the angle of the bike stem’s body.
For mountain riding, a bike’s front end height is usually dictated by the carbon or alloy handlebars. That’s why if you want a higher front end, handlebars with more rise are needed. On the other hand, if you want something with a lower front end, I highly recommend choosing flat handlebars.
When in doubt, it is always good to start at a safe range of stem angles. These angles are somewhere around 5 to 6 degrees. But if you have a stem below 70mm, zero degrees is the way to go. A zero-degree angle gives a neutral placement of your bike’s clamp area. Besides that, it does not restrict you to a too low or tall front end.
3. Check the Bar Diameter
Bar diameter is the bike handlebar’s diameter, which the stem locks on. The usual handlebars for new mountain bikes is 31.8 mm, which is bigger than the previous standard of 25.4 mm. If a rider is unsure which diameter he/she has, always get the tape measure or a ruler and measure it carefully.
It is challenging to keep up with every update because the biking industry loves to introduce new standards from time to time. That’s why there’s a new diameter in the market, with a measure of 35 mm.
Stiffness is another thing that must be given importance in handlebars. If you prefer something stiffer, then it is good to change to a 35 mm diameter. However, it may be hard to find handlebars or stems that accommodate that. There are not many companies that support a 35 mm size yet.
4. Consider The Clamp Design
Clamp design is also vital. There are two clamps on a road bike stem, one at the front’s handlebar and another at the fork steerer tube on the bicycle’s back area.
Do note that in almost all stems of high quality, the anterior bars have a clamp that utilizes a four-bolt structure. It is stiff and sturdy. So, riders will never have to worry about cracks that may surface, which is usual on old-fashioned two-bolt face plate designs.
Now that we’re tackling the clamp design, let’s include a few things about a rear clamp. This part promotes good bike fit on the bike’s fork steerer tube. It may have a bit of a variety when it comes to design.
Note that the most common rear clamp uses a two-bolt structure. On the other hand, a DH bike stem often utilizes a huge single bolt on its back area. Longer XC bike stems make use of a wedge structure that comes with a bolt attached in the bike stem’s body, found in front of your bike’s fork steerer tube.
It is also reasonable to search for a road bike stem with no protruding rear clamp bolts. These bolts usually hurt or injure your knees when you accidentally crash. Do note that most decent stems come with rounded-off or cowled structures.
Pro Tips:
- Remember that if you measure a bicycle stem, the process of measuring a road bike’s stem is similar to measuring a mountain bike stem length.
- When converting the unit from centimeters to millimeters, you must add one zero to the end of every size or measurement.
I know I have already introduced the importance of reach, lengths, and rise in a stem, but it won’t hurt to learn more about them.
Remember that extensions/lengths, which usually come in millimeters, are the actual length of the road bike stem starting from the middle of the steering bore. It goes straight to the center of your bike’s clamp. An extension is also known as the length of the stem.
Reach, on the other hand, is the effective length of your bike stem and does not include rise. You measure this point in millimeters and start off from the midpoint of your steering bore into the middle of your bike’s handlebar clamp.
Height is the total length of your stem’s vertical area. It is a crucial component that affects the rise and the drop. This point is also affected by your weight.
Finally, rise is measured from the handlebar clamp’s center to an imaginary line that bisects the midpoint of your bike’s extension, as well as the vertical area of the bike quill stem.
The comfort in your front wheel, saddle, and stem affects the ride, so it is important to choose the right one. Riders can also check out this video tutorial to know more about measuring bike stems. There are even comments and posts below the video to help you with questions.
Conclusion
Did you enjoy the tutorial on how to measure a bike stem? If you do, you could help us by sharing this with your friends and loved ones.
The info in this post is crucial for me as it saved me time and money from inaccurate bike quill stem measurements. It became a total life-saver.
I like the Kutir Measuring Tape because it helps me get accurate sizes. You can also tell us about what you like in the comments. We will surely appreciate it.

“Bike commuting should be the trend for the next few years, and it is a convenient and eco-friendly way for us to travel. And we are here to make it a bit less troublesome for people who want to maintain their vehicle for a long time. So, the content I expect to put out here is offering help for bikers who are facing issues with parts of their bikes once in a while. Let’s have fun and protect the environment together!”