Adjusting a bike’s hydraulic disc brake may come off difficult, especially for beginners. Some individuals even turn a blind eye to it without considering the things they miss out on when not having a properly adjusted disc brake.
Lift your comfort up to a whole new level and cycle faster, even when you hit the road or terrain for hours. This article will show you how to adjust hydraulic disc brakes on a bike like a pro.
Table of Contents
What Do You Need
To start off, you will need to know some important parts of a Hydraulic disc brake. This will help you go through the adjustment process smoothly.
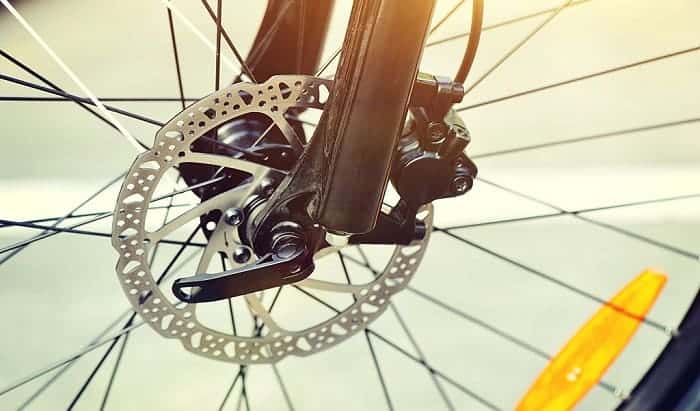
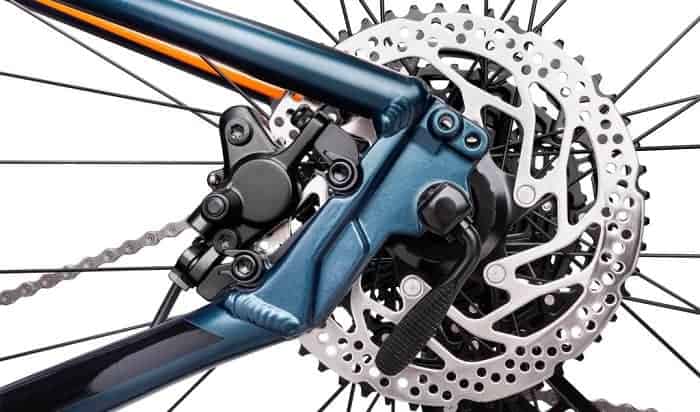
- Caliper – this portion of your bike’s brake efficiently locks the pads down on the disc, specifically when you use your finger.
- Plunger or Piston – made out of metal, clay, or composite pipes pulled and pushed by the fluid’s pressure in your bike’s brake mechanism. They drive the pads to the rotor in return.
- Disc/rotor – It is the circular metal plate installed to a hub that slows your bike’s speed.
In addition to the information above, here are some things you should have:
- A bike stand and good lighting: A bike stand will keep your bike in one place and help you work more easily. It’s also important to ensure your working area has good lighting. Otherwise, you will struggle to see and adjust the bike’s components.
- A caliper alignment tool: This can be helpful for users who aren’t comfortable with using their hands and need help tightening the bolts or preventing friction between the rotor and the braking pads.
- A rotor truing fork: A tool like this can straighten the rotor and make the caliper easier to center.
Pro Tips to Help You Adjust Your Brakes
As your disc brakes wear over time, the pistons naturally front up to keep the pads’ friction surface the same distance from either side of the rotor. When this happens, the pads and the rotor will be rubbing against each other, preventing the rotor from spinning within the caliper.
This is why it’s often necessary to re-center your rotor’s brake caliper to ensure that the wheel and rotor spin freely.
As a recreational biker, it is best to adjust your hydraulic disc brake as it helps track your rotor’s condition, such as ensuring it isn’t bent. Follow the steps below to do so.
- Position your Bike Properly and Ensure it is Well-lit
Proper bike placement will make your work easier. It allows you to work on your bike’s brakes easily, like spinning the wheels freely.
Before you can efficiently align your disc brake, you will need a good line of sight down through the caliper, which is achievable by putting your bike in the stand. However, if you don’t have a stand, a more tedious way of overturning your bike also works.
The next thing to note is to ensure that your bike receives a good amount of lighting. This will allow you to see things with no worries and accurately adjust your disc brake.
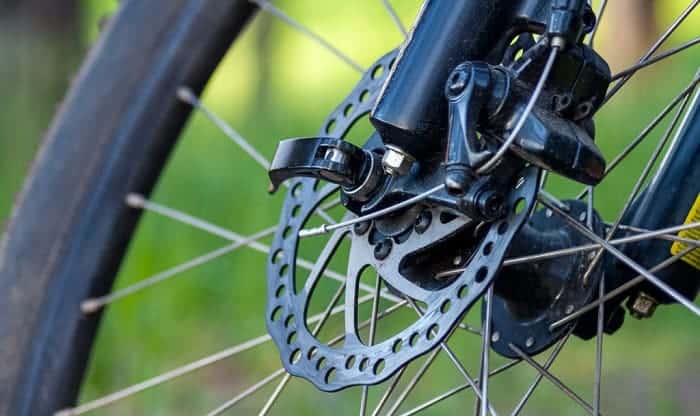
- Loosen the Brake Caliper Bolts with One Full Turn
It is about time to mount your brake calipers and align them properly. The first thing to do is to turn the caliper to the bottom and back it up in one full turn.
By doing so, you can easily tighten the caliper bolts after you have the caliper in the right spot.
Also, take note that you use the caliper bolts with a washer on the head as a caliper with no washer tends to go to the bolt’s turning direction during tightening.
- Tighten the Brake Lever to Align the Caliper
By now, the brake caliper bolts are loosened slightly. This allows you to control the caliper manually to ensure that it is not getting stuck or hung up on something. The next step is to squeeze the brake lever tightly so you can center the caliper.
However, only moderately tighten the caliper bolts. The excessive squeezing of caliper bolts will be unnecessary. The next thing is to spin your bike’s wheel to test if the rotor is causing friction with the brake’s pads.
You have to carefully observe how each piston moves to determine whether you need to realign your calipers.
Calipers usually require a bit more finesse after this step. But centering the caliper this way is a good start.
- Use a Caliper Placement Tool
This next step is completely optional and can only come in handy for those uncomfortable working with their hands.
I have a keen caliper alignment tool in my toolbox, a Hayes alignment tool to be specific. I usually like to align the caliper by hand, but this is a handy tool when adjusting gets challenging.
Bikers can use this tool if your rotor keeps on rubbing badly with the brake’s pads. If this happens, do not worry about re-doing your work over again. Also, you can check out this guide for more on how to adjust bike brakes rubbing here.
Loosen the caliper bolts and try the previously-stated steps. But this time, we are going to place this caliper alignment tool in the middle of each rotor and caliper side, leaving just the right spacing on the rotor’s sides.
Afterward, you can squeeze down the caliper bolts using the caliper alignment tool attached to them. After that, you can remove the tool to see if the rotor is still rubbing or not.
- Align the Caliper using your hand
When it comes down to proper adjusting, a lot of bikers usually prefer this method. Aligning your bike’s caliper is more convenient by using your hand.
You first have to ensure a good line of sight through the caliper and try to focus the latter on the middle to prevent the rotor from rubbing on the pads. When it’s time to squeeze each of the caliper bolts, it would be best to tighten each caliper bolt slowly.
Do it one step at a time. Torquing a caliper bolt all the way below while the other caliper is still loose causes it to move to one side, which will force you to start all over again.
When you are almost finished, you can also work with just one caliper bolt at a time. In that way, you won’t be starting from scratch whenever the pads and rotors rub together.
- Bend the Rotor Straight
There are times when the rotor can be slightly bent, which makes caliper centering almost impossible. In this situation, you will need to straighten the rotor first. I suggest using a rotor truing fork to make this process easier.
It is important to note that when you are spinning the rotor through the wheel, listen and observe where the rotor contacts the disc brakes. You can then spin the wheel to get the bent portion away from the caliper.
Conclusion
Do you find this tutorial useful and entertaining? I find this tutorial handy when I have to adjust my disc brakes all by myself. As a working mom, I have little to no time to fix things.
Knowing how to adjust hydraulic disc brakes on a bike, I could have more time hitting the road and keeping my bike in top shape.
Write down in the comments your thoughts. Take notice of these steps and tell your friends about this tutorial as this will also help them a lot. Together, we can make disc brake adjustments a piece of cake.

“Bike commuting should be the trend for the next few years, and it is a convenient and eco-friendly way for us to travel. And we are here to make it a bit less troublesome for people who want to maintain their vehicle for a long time. So, the content I expect to put out here is offering help for bikers who are facing issues with parts of their bikes once in a while. Let’s have fun and protect the environment together!”